


It's definitely feeling like the last rush to the finish line here. There may still be a week to go till Christmas, but it feels like it all needs to be done NOW! No bad thing, I can then relax for a week, and rejuvenate in time for the festivities :)
The 10yr old is an avid reader and, in our little cottage, books tend to pile up on the floor for lack of storage space: so the boyf and I decided to get her a Kindle 4 this year. One of the last minute jobs was to make a cover for it, it will go everywhere with her for a while and as careful as she is, I don't want to weather the "it's scratched!!" storm!
This is a very easy cover, well it should have been, I was making it in a rush and the cover in her stocking is actually version 3! But, don't rush and it's a nice simple job.
You will need a lining fabric, I had a beautiful dark grey wool scrap, you could use felt instead; and an outer fabric, the 10yr old has had a yard of cotton with a beautiful bird design on it sat around forever, I stole a little of that! I saw patterns online for other Kindles and the IPad that used oilcloth or waterproofed cotton, this could also be a good idea, I may make her an all-weather cover another day. You could also add ribbon ties and any embellishments that you want.
I looked at other patterns which seemed to allow a lot of movability within the case and needed ribbon ties or buttons to close; this was something I wanted to avoid as anything that can slip out or relies on a 10yr old to remember to close it properly will invariably leave her with one damaged Kindle. I was going for the snug fit cover!
So, I laid the kindle on the felt, which I had folded in half and pinned in place. The long side of the Kindle sat against the fold and I drew around it. I then stitched 1-2mm on the outside of the line along one short edge and the other long edge, making a pocket with a top opening. On the top edge I trimmed the fabric to match the height of the Kindle and on the sewn sides, I trimmed the fabric to 3-4mm from the stitch line. The Kindle fit snugly inside. Do not turn it inside out.
 |
| Wool lining, stitched along two sides and trimmed. |
I then laid the lining on the outer fabric which was again folded in half (right sides together) and pinned in place. I roughly trimmed it to size, leaving an 1 inch excess as shown below. I placed the fold of the lining against the fold of the outer fabric drew around it.
 |
| The lining works as a template for the outer fabric. |
Again, on the two stitched seams, bottom and side, I stitched 1-2mm away from the line that marked the edge of the lining and trimmed it close. On the top, opening, edge I left the 1 inch excess.

The outer lining was turned inside out and pressed in place, the inner lining then eased inside. In turning the outer fabric, the long seam is now on the opposite side to that of the lining, which makes for a smoother finish and the stitched edge of the lining gives a little more definition to the folded side of the outer fabric.
Once the lining was in place, I folded the 1 inch excess at the top in half, pressed it; folded it again to cover the lining and pressed again for a crisp edge. This was pinned in place and in the photo below I also show that at this point you could pin ribbon ties in place, though I decided not to use them as the idea is that this cover will not need a closure.
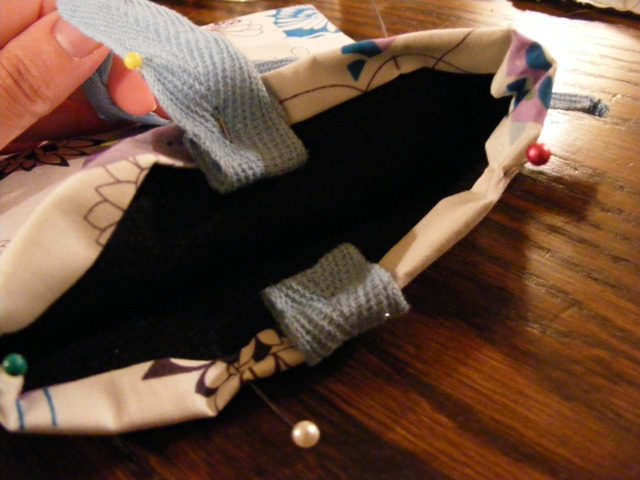
You could then slip stitch the top edge closed for a hidden finish or stitch it down with a contrasting thread or decorative stitch. I decided to simply straight stitch it because I want to add some embellishments after Christmas. My sewing box is temporarily packed away (it sits where the Christmas tree now is) and in it is a pretty blue sequin trim. It's those things that the 10yr old likes to have a say in, so this is the basic pocket, we'll have an afternoon of frills and furbelows after Christmas!

And there it is, one Kindle cover. Once fully in, the top of the Kindle sits just beneath the top of the cover, protected but easy to get too and if you were to put the Kindle partly in, as it is in the picture, and then pick up the cover by the end, it takes quite rough shaking (nerve-wracking shaking!) to shake the Kindle loose... The idea was that it would stay on, whatever was happening, unless deliberately removed and I'm pleased to say that it works - I'm pretty happy that this cover will be 10yr old proof!


No comments:
Post a Comment